
How To Connect Solar Panels to a House
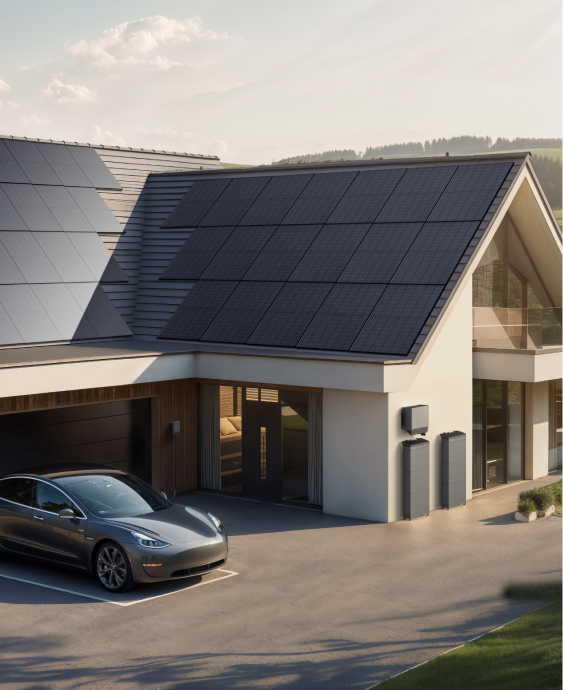
More and more homeowners in the UK are switching to residential solar power systems to save money on energy bills, reduce their household carbon footprint, and decrease reliance on the National Grid.
Rooftop solar panel installations are by far the most commonly used consumer photovoltaic (PV) systems that produce electricity from sunlight.
But solar panels can’t power your home on their own.
You’ll need to connect them together using the appropriate method and to an appropriate balance of system that typically includes a solar inverter, a charge controller, and solar battery storage.
Want to know how to connect solar panels to your house?
Read on to find out.
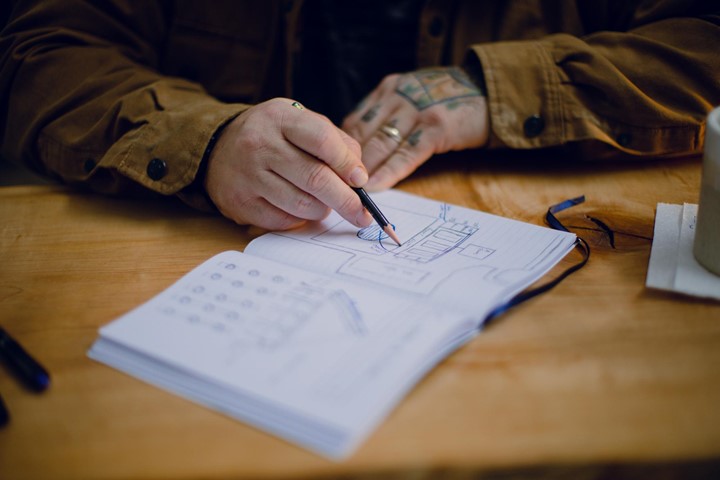
Step 1: Plan Your Installation Layout
Achieving the optimal positioning and wiring for home solar panel arrays requires considering the unique characteristics of the house and installation area, i.e., ground or rooftop.
Essential factors to consider when planning a solar panel installation include:
- Available surface area that receives direct sunlight
- Peak sunlight hours at your location
- Permanent obstructions and shade
- Distance between PV modules and the cable run length from the last panel in the array to the solar inverter or charge controller
- Direction, positioning, angle, and tilt relative to the sun’s position as it moves across the horizon during the day
Step 2: Test Your PV Modules and Solar Power System
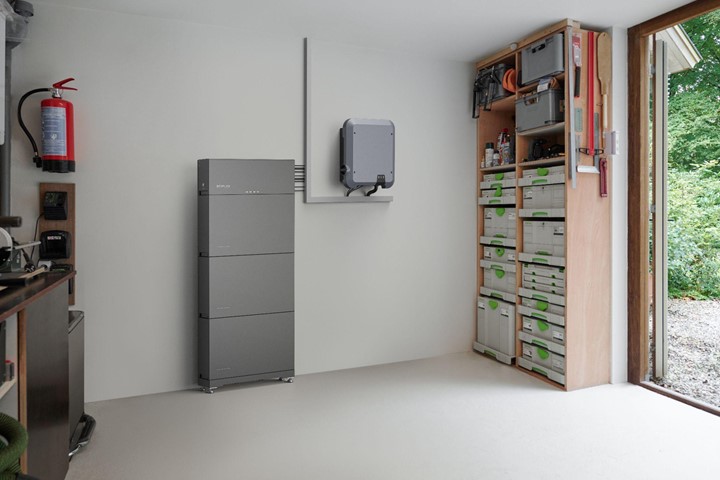
Unlike traditional residential photovoltaic systems, modular home battery and solar panel solutions like EcoFlow PowerOcean have all the required balance of system components built-in, including:
- Solar inverter
- Solar batteries (LFP)
- MPPT charge controller
- Advanced battery management system (BMS)
Decide whether it’s best to connect your solar panels in series, parallel, or a hybrid of each.
Parallel connections increase voltage, which is often desirable for small arrays of 2 or 3 solar panels.
Larger arrays are usually best connected in series, which increases amperage — not voltage — or series/parallel, giving you the best of both worlds.
More on series vs parallel connections below.
Testing your chosen configuration outside in direct sunlight before installing solar panels on your roof is essential.
Ensuring that the solar panel array and balance of system are operating as expected avoids having to make costly adjustments to your configuration once the PV modules are already mounted on your roof.
EcoFlow PowerOcean provides a web portal and mobile app that allow users to monitor and control the system from anywhere with an internet connection.
It’s easy to see how much electricity your solar panel array generates in real time.
Remember, it’s to be expected that no photovoltaic system will produce 100% of its rated power output at all times of day.
Less direct sunlight = lower electricity generation potential, and solar panels don’t work at night.
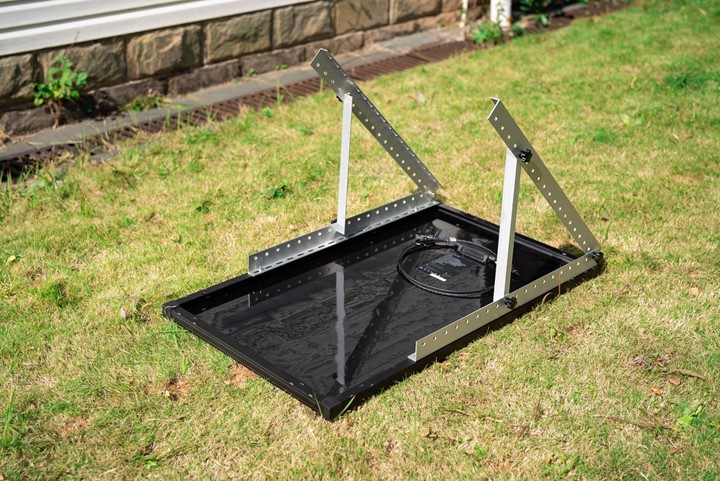
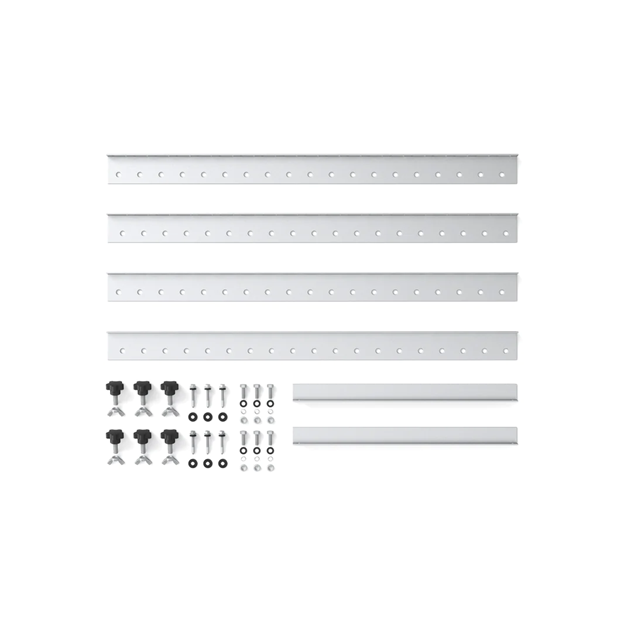
Step 3: Assemble Your Mounting Hardware
400W rigid solar panels typically come with 4 x solar mounting feet.
But unless your roof is perfectly angled for maximum sunlight exposure, you will need additional hardware.
Depending on the manufacturer, you can usually purchase Tilt Mount Brackets designed to make solar panel mounting simple.
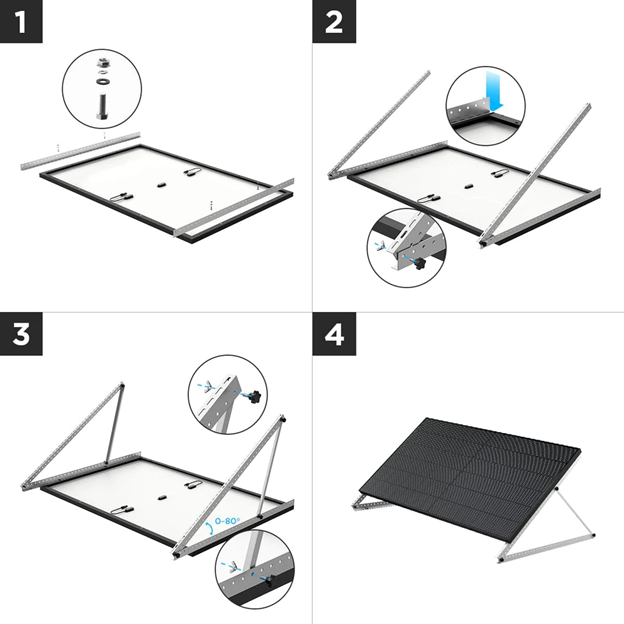
In the image above, a 50” (127cm) Tilt Bracket makes mounting 400W rigid solar panels on a rooftop (or any other flat surface) easy.
All you need is the following tools:
- Adjustable wrench (M8 and M12)
- Tape measure
- Safety glasses
- Work gloves
If you prefer a different method of mounting your panels, such as a racking system, many 400W rigid solar panels are designed to integrate with third-party mounting systems.
Tilt Brackets are a painless option for mounting your PV panels and positioning them optimally on your roof.
EcoFlow PowerOcean is seamlessly compatible with most PV modules manufactured by third parties.
Detailed assembly instructions are included with the brackets. Anyone with even minimal DIY experience can assemble this mounting hardware.
Just be careful up on the roof!
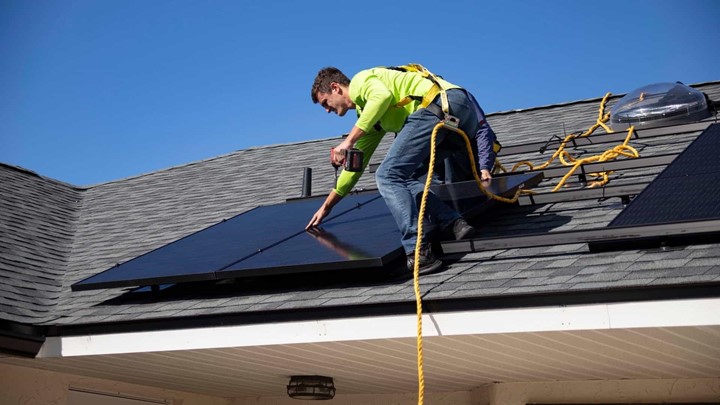
Step 4: Mount Solar Panels on Your Roof
If you’re mounting your own solar panel array, the first step is to ensure you have a sturdy ladder and some help.
Most 400W Solar Panels weigh over 20kg and have dimensions of 175cm × 115cm ×3.5cm or more.
That’s a lot of bulk for one person to carry up a ladder safely.
Using the tilt brackets will add a bit of weight but may make the panels more manageable to carry.
Once you have all your panels on the roof, arrange them in the configuration you mapped out in Step 1.
Double-check that your wiring plan is correct.
The panels should be as unobstructed as possible by buildings, trees, and other obstacles that limit sunlight exposure during the day.
Leave between 15 and 20 cm of space between each PV module.
It’s not advisable not to mount solar panels any closer to 31cm from the edge of your roof.
Building code requirements for minimum distance from the roof’s edge in your location may exist.
Once you’re satisfied that the positioning is optimal, secure the panels to the roof with Tilt Brackets or whatever mounting system you’ve chosen.
Step 5: Connect Solar Panels in Series or Parallel
You should have already decided during Step 1 whether you’ll benefit most from connecting your PV modules in series or parallel—or a hybrid of each.
Getting this step right is essential…
Overloading the solar charge inputs with too much voltage or amperage can permanently damage your system and create hazardous conditions.
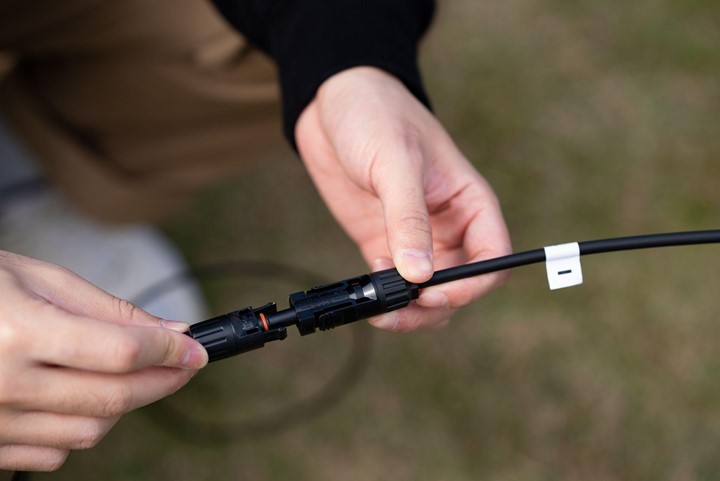
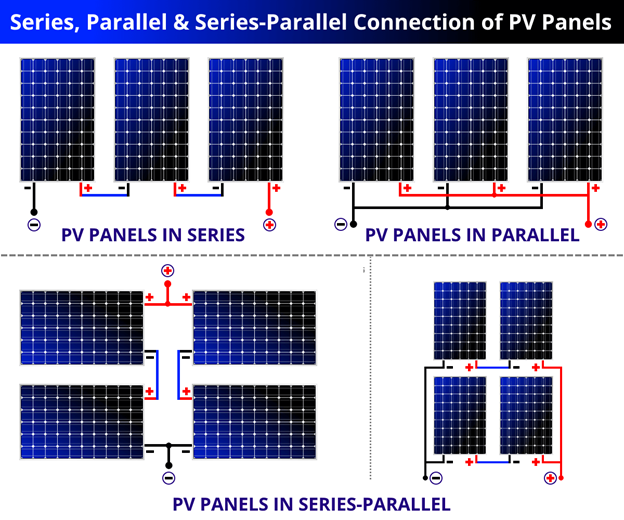
Series Connection
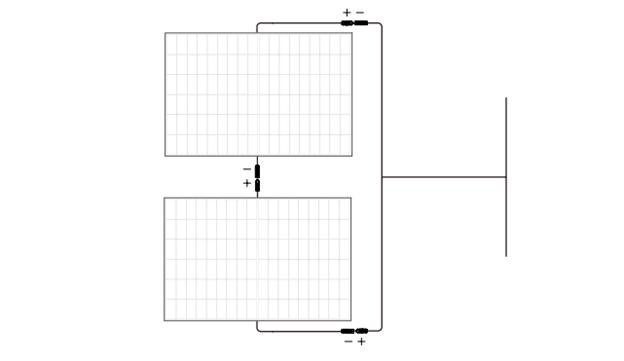
For series connections, connect the first module's positive connector to the negative connector of the second module. Continue in sequence (positive to negative) until you have connected all the panels.
The positive (usually ‘male’) connector of the final solar panel in the array transmits the combined positive output of the connected modules.
The negative (usually ‘female’) connector of the final solar panel in the array carries the combined negative output of the connected modules.
Connect the male and female plugs or wires to the corresponding inputs on your solar inverter or charge controller.
A series connection between solar panels combines the voltage output of each module.
For example, 4 x 400W solar panels with an Open Circuit Voltage of 35V connected in series will have a total maximum output of about 140V (4 x 35V).
The output in watts and amps does not combine and remains roughly the same as the rated output of one panel, no matter how many modules are connected in series in the array.
For relatively small installations, connecting the panels in series is often recommended.
For large rooftop arrays, series connections can result in overvoltage output that can be dangerous and permanently damage your system.
It’s recommended that you test all connections—series, parallel, or hybrid—with a multimeter BEFORE connecting the array to the solar inverter, charge controller, or EcoFlow PowerOcean.
Parallel Connection
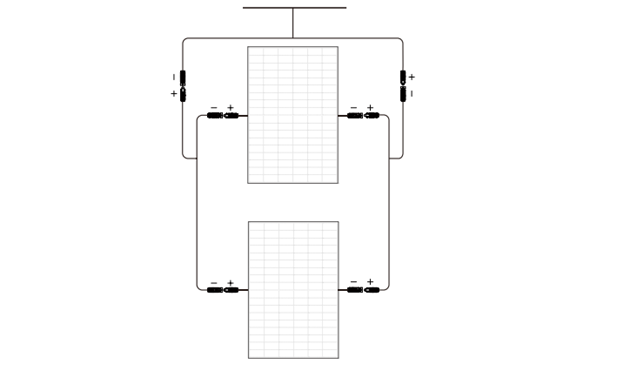
Parallel connections combine the current (amps) of each module while keeping voltage and wattage output relatively the same.
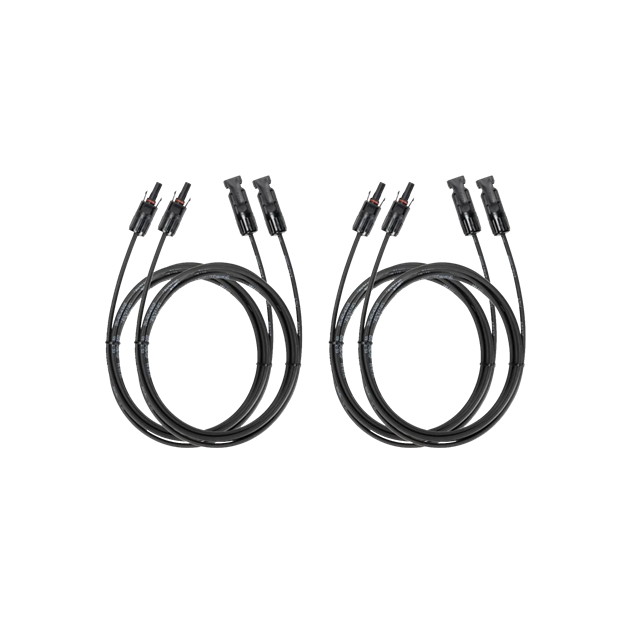
Most solar panels use standard MC4 plugs to connect to each other and the balance of system.
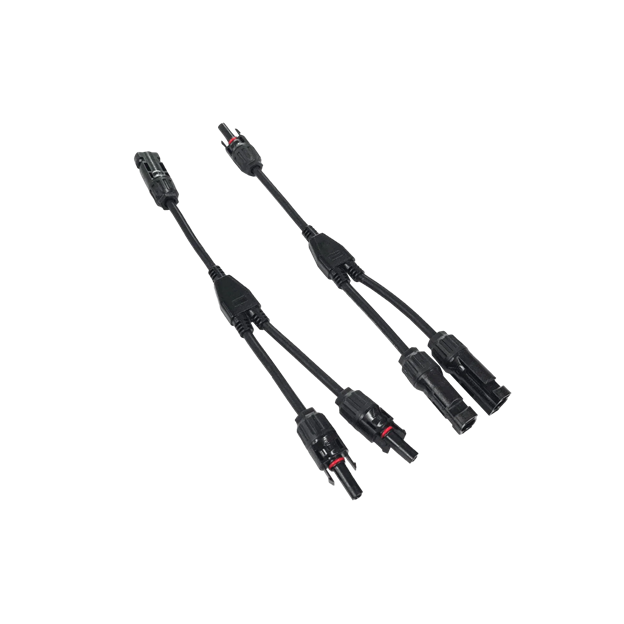
If you wish to connect the PV modules in parallel, you may have to purchase MC4 parallel connectors (also called branch MC4 or Y-connectors) if your solar panel manufacturer doesn't provide them.
Plug the positive connector (usually male) of the first panel into the positive input on the Y-connector and the negative connector to the negative input.
Continue in sequence (positive to positive/negative to negative) until you have connected all the panels.
The MC4 connectors from the final panel in the array will transmit the combined amperage of all modules connected in parallel.
For example, 4 x 400W solar panels with a Short Circuit Current of 14A will have a combined output of 56A when connected in parallel.
The wattage and voltage output remain roughly the same as from a single panel in the array.
Large or complex arrays that use parallel connections may require a circuit box that offers additional protections to Y-connectors.
As with series connection, it’s highly recommended that you test the array’s output with a multimeter BEFORE connecting to the solar inverter, charge controller, or EcoFlow PowerOcean.
(Source: Electrical Technology)
Hybrid (Series-Parallel)
Hybrid connections that take advantage of series and parallel connections to optimise electricity generation based on the unique characteristics of your installation location and other factors are usually the best way to maximise your PV array’s output potential.
However, hybrid wiring and connections should only be undertaken by trained professionals…
It’s not something you can DIY.
Step 5: Connect the Solar Panel Array to Your Balance of System
Once your solar panel array is connected in series, parallel, or hybrid, you must make one final connection.
Depending on whether your solar power system is grid-tied, off-grid, or a hybrid solution like EcoFlow PowerOcean, the output from the final PV module in your array connects directly to the solar inverter (on-grid), charge controller (off-grid systems with solar battery storage) or the solar charge inputs on the hybrid.
One of the benefits of EcoFlow’s home battery solar solutions is ease of installation,
There should be no confusion about how and where to connect your solar panel array.
Remember to keep the distance between the closest panel in your array and the balance of system as short as possible.
The longer the cable, the more electricity will be lost in transmission. The shorter the connection, the more efficient it will be.
Step 6: Test Your Residential Solar Power System for 3 Days to 1 Week
Small solar generators don’t require a direct connection to the utility grid or your home circuitry.
You can simply plug solar panels and home appliances directly into the inputs on the unit.
However, at minimum, all grid-connected systems or off-grid/hybrid solutions that integrate with your home wiring require professional installation by a licensed electrician.
Depending on the exact configuration, permitting and inspections may also be mandatory, particularly if you wish to participate in the Smart Export Guarantee scheme (SEG) by feeding in electricity your system generates to the National Grid.
If you’ve gone DIY up to this point, testing your solar panel array in real-world conditions for at least a few days before connecting it to your home wiring and/or the grid makes sense.
If your system isn’t performing as expected, it’s best to find out before paying an electrician or scheduling inspections.
Otherwise, you may suffer costly delays and pay additional fees for repeat visits.
Step 7: Connect the Balance of System to Your Home Circuitry and/or the Utility Grid
Integrating EcoFlow PowerOcean (or other balance of system) and your solar panel array with your home circuitry and/or the National Grid is simple — for a licensed electrician.
Each step up until this point has been within the capabilities of the average handyperson.
Connecting your system to high-voltage electrical circuits is not.
Under no circumstances should you attempt to connect EcoFlow PowerOcean (or any other balance of system) to your home electrical system on your own.
You must use a licensed electrician.
If you don’t, you’re probably breaking the law, and certainly putting your life and the safety of your home at risk.
Hire a professional to install a bidirectional meter for grid connections and/or a transfer switch for home wiring integration.
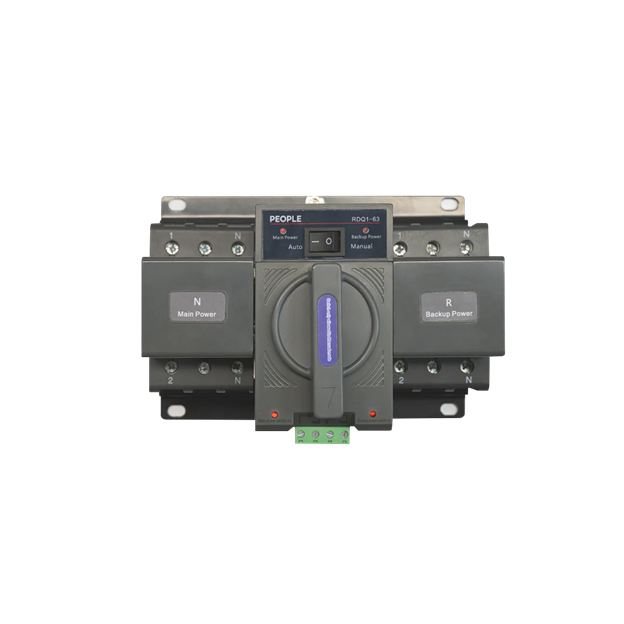
A transfer switch is a device that manually or automatically switches a load between on-grid and home backup power.
An electrician will integrate the transfer switch with your main home circuit board — and a bidirectional meter if you’re transmitting electricity to the grid.
Monthly Average Daily Sun Hours in the United Kingdom From January 2015 to September 2024
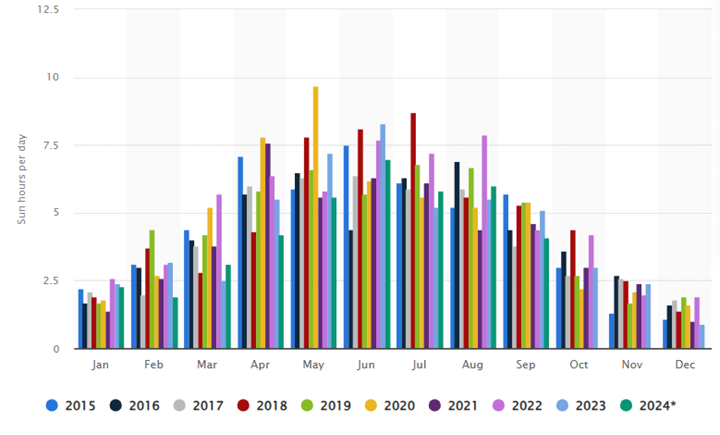
(Source: Statista)
Solar Panel Installation Tips
Achieving optimal performance from a solar panel installation is an art and a science.
Simple systems that use 4 PV modules can be plug-and-play…
But if you’re installing a complex system with multiple solar panels mounted on your rooftop, working with a reputable installer is likely worth the additional investment.
Here are some solar panel installation tips if you go the DIY route.
-
● Maximise Sunlight Exposure: It’s essential to install your solar panels in a position to capture the maximum amount of direct sunlight during peak hours each day.
-
Homes in the UK only receive a daily average of 2-3 hours of peak sunlight — Imake the most of it!
-
Solar panels should always face southwards in the UK.
-
● Optimise Positioning: If you want to maximise sunlight capture and electricity generation potential, facing your solar panels in the right direction is only one piece of the puzzle.
-
Positioning, angle, and tilt all play a crucial role.
-
Maximising your solar panel array’s electricity generation potential is not straightforward.
-
Working with a reputable installer will likely pay dividends in the long run.
-
● Series, Parallel, or Hybrid Connection: Connecting your solar panels in series or parallel doesn’t significantly alter your array’s combined output in watts, but it has a definitive impact on voltage and amperage.
-
For arrays that include 5 PV modules or more, a hybrid configuration that mixes serial and parallel connections based on the location of the individual PV modules relative to the Sun’s position on the horizon during the day is likely to provide the best results.
-
It’s unwise to attempt complex wiring of PV modules without professional help.
-
Making the wrong choices will reduce your electricity generation potential at best.
-
At worst, you could permanently damage your system.
-
● Avoid Permanent Obstructions and Shade: Shade from permanent obstructions like neighbouring buildings and trees is often unavoidable, but you can take steps to mitigate the negative impact.
-
For example, if one solar panel in a series-wired system is in darkness, the combined output of the entire array is reduced to the level of the shaded module.
-
PV modules wired together in series are only as powerful as the chain’s weakest link.
-
You can get around this limitation by connecting solar panels in parallel, but you’ll miss out on the benefits of series connections.
-
A professionally designed hybrid configuration that mixes series and parallel connections helps minimise the negative impact of shade.
-
● Consider Reflective Surfaces for Installation
-
Mounting your solar panels on a reflective surface can significantly boost their production.
-
Particularly if you opt for bifacial solar panels, which also help maximise electricity generation on cloudy days.
-
Depending on your rooftop or ground installation location, investing in a reflective covering may be an inexpensive option to help get the most out of your solar panel array.
Frequently Asked Questions
- Can I Hook up Solar Panels Myself?Yes. Most modern PV panels use universal MC4 solar connectors that make it easy to connect modules together and to a solar inverter or battery charge controller. However, the position and angle of solar panels has a significant impact on performance and rooftop installations can be hazardous. Many homeowners choose to work with a reputable installer to optimise electricity generation and minimise risk.
- How Do I Connect Solar Panels to My House Electricity in the UK?Connecting solar panels to your home’s existing circuitry requires, at minimum, a solar inverter and manual or automatic transfer switch. Off-grid and hybrid residential solar power systems with solar battery storage require additional components like a charge controller and battery management system. Integrating your home solar power system with your wiring and/or the National Grid requires a licensed professional installer or electrician.
- How Long Does Solar Panel Installation Take?Most home solar panel installations take less than a day, and small photovoltaic arrays can be installed in an hour or less. Integration with home wiring and/or the National Grid requires a professional installer and/or licensed electrician. It’s not a time-consuming job for an experienced professional. Still, it’s necessary for safety, permitting, and eligibility for the Smart Export Guarantee (SEG) if you choose to sell electricity to your utility provider.
Final Thoughts
Investing in a residential solar power system with battery storage pays off in many ways, including slashing your energy bills, providing home energy security, and greatly reducing your household’s carbon footprint.
EcoFlow PowerOcean is a comprehensive home battery solution that provides up to 40kW solar input and 29.9kW AC output — more than enough power to run almost any home.
EcoFlow offers a variety of smart home energy solutions, including whole-house batteries, solar battery retrofits, heat pumps, immersion heaters and more.
Check out our selection today.

